Showing posts with label Recipe - Dinner. Show all posts

Saturday, August 2, 2008

Roasted Red Pepper Pesto - Two Ways

As is frequently the case when posting to this blog, I am eating leftovers of the dish I am going to be writing about. In my book, a recipe is *really* good when it makes it as leftovers. Also, a recipe ranks very high with me when it takes well to adaptation. This entry is about just such a recipe.

I often forget about certain ingredients, like roast bell peppers in this case. I seem to eliminate roasted peppers of any kind from my ingredient list because I have an electric stove and an apartment that lacks good ventilation, making it risky to roast my own. Out of desperation I have rediscovered the jarred roasted pepper, and, I have to say, they do the job quite well!

I was pushed towards experimenting with jarred peppers when I stumbled upon a roasted red pepper pesto on Sherry's blog. (She will be missed! For posts about Sherry visit this link) The photos of her pasta dish made my tastebuds tingle and I knew I had to try it. I didnt have all the ingredients the original recipe called for so I changed it up to suit what was on hand. The result was surprisingly refreshing and took no more than three minutes to assemble. Plus, since this pesto is simply blended, it only requires the cooking of pasta which cuts down on kitchen heat. The meal was a special treat since my mom had brought back beautiful pasta from her recent trip to Italy. The end result was aromatic and gorgeous.
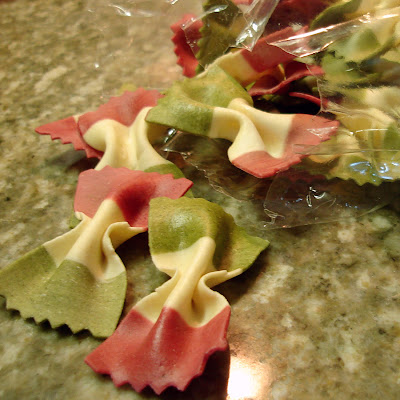

Roasted Red Pepper and Lemon Basil Pesto

1 garlic clove
3 roasted red bell peppers
4 large walnuts
1/3 c. lemon basil
1/4 c. parmesan
salt and pepper*
1/4 c. olive oil
1 lb. pasta cooked

In a blender or food processor combine the first seven ingredients. Top hot pasta with the pesto mixture and add parm to your liking.

*Because the pasta sauce is not cooked and doesnt have time to meld, I tend to add more salt than I normally would.

~~~~~~~~~~~~~~~~~~~~~~~~~~~~~~~~~~~~~

Given the fact that the first pesto recipe was to die for, I tried another variation of it for dinner two nights ago. The basil at the grocery store was kinda sad but the cilantro looked wonderful, so I opted to season the pesto with cilantro and took a non-traditional route. I also didnt have any parm on hand since I had yet to go to Trader Joe's (and there is no way I am buying parm from Target) but I had about 2 oz. of goat cheese in the fridge and figured that would work well. In the end the pasta dish had a rich mediterranean flavor that I will crave again and again!


Cilantro Pesto with Roasted Red Peppers

1 clove garlic
3 roasted red peppers
1/3 c. cilantro leaves
2 oz. goat cheese
4 large walnuts
salt and pepper*
1/4 c. olive oil
1 lb. cooked pasta


Combine the first 7 ingredients in a blender or food processor and pour atop hot pasta.

I added 16 oz. of artichoke hearts and several chopped green onions to get more veggies in the dish.

If you experiment with variations on this dish please forward it on since I love to hear how people have amended recipes to suit their tastes.

Sunday, April 27, 2008

Moroccan Orzo Salad

You all can call me MS, officially. I have deposited my Master's thesis and am done with edits and insane formatting requirements. I have been celebrating by taking it easy this weekend and figured I should get back in the swing of blogging.

To be fair, by not posting I saved you all from really bad entries about whether yellow or dijon mustard tastes better on hot dogs (it depends on if there are onions involved) and the science behind the peak (and decline) of leftovers. In addition, there is also no way to photograph Taco Bell's 7-layer burrito that makes it appetizing (yet I consume it regardless).

The little bit of time that I have on my hands is driving me batty. I am definitely back in the cooking mood and there are SO many options. I am especially excited about eating something tasty again; these last weeks have been pretty barren in the flavor department. To add to the cooking itch, the weather is changing and it promises fresh produce. The Lafayette farmers market officially begins next weekend and while I am not certain what will be available so early in the season, I am looking forward to it nonetheless. There is also the prospect of establishing a "community garden" of sorts in K's backyard. I am looking into planting poblanos, thai chilies, arugula, shallots, and golden beets. I might throw lima beans into the mix just for kicks. Roma tomatoes would be nice too but I will be gone for about a month in the middle of the summer and dont want to waste produce while I am away.


I celebrated my successful thesis deposit by heading to home depot and purchasing fresh herbs. Its true, I am a big dork, but thats how I chose to celebrate. I purchased spices that wouldnt get too big for my balcony and that are difficult to find in mass quantities at the farmers market. So far I have lavender, mint, thyme, sage, and thai basil. I am envisioning frequent mojitos and massive quantities of thai chicken. Yup, its going to be a good summer.


I kicked off my return to the world of good food by making goat cheese fondue to have with broccoli, apples, pears, and sourdough. I flavored the goat cheese with white wine, garlic, and shallots. For some reason goat cheese fondue is my ultimate comfort food. It is so easy to make that I always wonder why I waited so long to make it.

Today I made a Moroccan orzo salad for dinner. It was easy also, but took a little longer to prepare because I had to boil the orzo and roast the veggies. It is currently sitting in the fridge "melding" with itself. I snuck a taste or two and I can hardly wait for dinner time (two hours and counting).


Moroccan Orzo Salad

Orzo:
2/3 c. orzo
1 c. veggie broth
1.c. water

Salad:
1 large can tuna
5 sweet peppers, chopped
2 large shallots, sliced
1 can artichoke hearts
1/3 c. fresh cilantro, chopped
2 cloves garlic, diced
10 green olives, chopped
2 T. olive oil
Salt & Pepper

Dressing:
1/4 c. lime juice
2 t. harissa
pinch cumin
pinch nutmeg
1/4 c. olive oil
salt
pepper

Heat the veggie broth and water together with the orzo. Simmer with the lid of the pot on until the orzo has absorbed all the liquid.

Toss the artichokes, shallots, and peppers with olive oil, salt, and pepper. Roast at 425 for 40 minutes being careful to not burn the shallots.

Remove the orzo from the heat once it has sucked up all the liquid. Transfer it to a large bowl and stir in the diced garlic and drizzle with a bit of oil so it doesnt stick to itself.

Once the roasted veggies are out of the oven add them to the orzo. Toss in the olives, cilantro, and tuna.

In a small bowl combine the lime juice, harissa, cumin, nutmeg, and the remaining olive oil. Pour the dressing over the salad and chill in the fridge for at least two hours.

Sunday, March 9, 2008

Homemade Japanese Pork Cutlet Curry

A few weekends ago, my friend M and I went to a pretty decent Japanese restaurant whose name I cant recall. It was there, in West Lafayette, this whole time and I had no idea. Though it made me happy to finally find a good asian restaurant in my town, it also made me crave some of the Japanese curry dishes I have had at the Curry House in LA. Specifically, it made me crave pork cutlet, smothered in spicy Japanese curry, sitting atop brilliantly white white rice.


I am still not certain where I found the time (I cant really recall when I made this dish), but I whipped up some Japanese curry, steamed some rice, made my own breadcrumbs, and learned how to properly coat a pork cutlet. Impressive, no?

The result was beautiful. The Japanese curry had its wonderful sheen and the pork cutlet was a golden brown and remained crunchy even after sitting in the curry sauce for a few minutes during the photo shoot. Best of all, it hit the spot!

Japanese Pork Cutlet Curry

2 bricks S&W hot curry
1 c. chicken broth
1 c. veggie broth
X c. water
2 cloves garlic
1/2 white onion
1 egg
1/2 c. flour
1 c. bread crumbs*
1 t. cumin powder
4 pork cutlets**
salt & pepper


Slice the garlic and dice the onion. Saute both until translucent.***

Add the chicken and veggie broth. Once the liquid is hot dissolve the curry cubes (each package has 5 sections of curry cubes) by stirring continuously. Let simmer until the curry thickens.

Add water to get the consistency you prefer.

Combine the cumin and bread crumbs.

Heat 1 T. of oil in a skillet.

Season the pork cutlets with salt and pepper.

Coat the meat with flour then dip it in the egg. Push the cutlet into the bread crumbs on both sides to get the crumbs to stick and add it to the hot skillet. Brown on each side for 3 minutes.

Remove the cutlet from the pan and place on a drying rack until ready to eat. This will keep the coating crispy.

Pile rice on a plate, top with a pork cutlet, pour curry over the top, and serve.

*If you have the Japanese version of breadcrumbs available, panko, use that instead.

**If you are using pork chops, you will want to flatten them to about 1/4 inch with a kitchen mallet.

***You can add other things to the curry at this point. I have used carrots, apples, and sweet potatoes with a good deal of success.

Wednesday, February 27, 2008

Tainted?

A little knowledge goes a long way. I have been increasingly concerned with the types of foods that I am eating. I want them to be free of chemicals, additives (whatever those are), and fillers. In short, when I buy cheese, I actually want it to be cheese. As such, I have started reading food labels.

A couple of weeks ago I noticed some fine print on the front of the sausage I was buying. "BHT and BHA added to preserve flavor" it said. I paused for a few moments, looked briefly at the other sausage choices that were available and added it to my cart. I filed those six little letters away to research at a later time. I figured, I had been eating that sausage brand forever and it probably wasnt a new ingredient, just a new label.

Regardless of the reason that I noticed the BHT and BHA abbreviations on my food, I finally got around to researching them (after purchasing several more sausage type foods all with the similar warnings). BHT stands for butylated hydroxytoluene and BHA stands for butylated hydroxyanisole. Basically they are fat preservatives added so that the sausage I purchased stays fresh longer. The general consensus on the multiple websites I consulted regarding these preserving agents was that they may affect your health. Apparently they arent real sure what it can do to you (one site said that while it cured some kinds of cancer, it promoted others) but I really dont want to stick around and find out.

I do not feel good about having something added to my food to make it last longer on the shelf. I dont want the food I buy to be too old, even if it still tastes good. Most of the time after I grocery shop the food sits in my fridge for a week or more anyways. While I hate when my food goes bad before I get to it (which doesnt happen to me much any more), I certainly dont want it full of preservatives that will pickle me from the inside.

I suppose I am glad that they have the labels on the packages so now I can determine if this preserving agent is in other foods I also eat. As for my sausage, Purdue has a butcher shop that sells pork sausage and my mom got me a meat grinder attachment for my kitchen aid so I am sure to be making my own sausage soon.

I did end up using the sausage in this great looking pasta. The first couple bites tasted funny to me but it was all in my head since the BHT warnings were fresh on my mind. I recommend making this dish with some additive-free sausage; it really was delish. The hot italian sausage, once I got over the fact that it was tainted, and the spicy arugula compliment the earthy bell peppers well.


Bell Pepper, Sausage, and Arugula Orecchiette*

1/2 red bell pepper
1/2 yellow bell pepper
1/2 large red onion
1/2 lb. spicy italian sausage
1/3 c. chopped flatleaf parsley
1 bunch arugula
1/2 lb. orecchiette cooked
1 c. pasta water

Brown the sausage with a bit of olive oil.

Meanwhile slice the bell pepper and onion into strips.

Add the bell pepper to the pan when the meat is half way cooked. When the meat with fully cooked add the onions. Delaying adding the onions allows some of their color to remain once the dish is served.

Saute the veggies in the sausage fat until just tender.

Add the chopped parsley.

Add the cup of pasta water to the sauce. Combine the cooked pasta with the sauce.

Toss loosely chopped arugula with the pasta and serve.

Top with parm for a little salty kick.


*Though the above recipe is my own, it was inspired by a similar one in the Everyday Foods Cookbook I posted about previously.

Tuesday, February 12, 2008

Brain Food

In the evenings I can almost always be found on my couch. I am not curled up watching a movie with a nice cup of hot cocoa. I am sitting with my computer on my lap (much like I am doing now), typing up my Master's thesis. There comes a point around 7pm when I realize that I havent eaten, that I am quite hungry, and that nothing is defrosted. Hm, what to do?


One time I made a turkey sausage sandwich with the last precious little bit of gorgonzola and caramelized shallots on toasted ciabatta bread. Granted nearly everything tastes good when you are nearing starvation, but I would guess that this meal tasted good even when full. In truth, I could have polished off two of these but didnt have enough foresight to defrost two sausages instead of just one.

On another occasion, after reading about all the superfoods you should eat on a daily/weekly basis I was inspired by soy beans. I ended up throwing some sliced scallions into some hot oil, adding some mint that I had wilting away in the fridge, and sauteing it all until the flavors combined. Then I tossed in the edamame I had nuked to defrost. I accompanied the soy dish with two toasted ciabatta (same loaf) slices. That 5 minute meal was mighty tasty as well.


For curious readers, my Master's is coming along. I will know the extent of the work cut out for me after I receive comments from my committee sometime next week. Until then (and probably after as well) I will be eating well.

Saturday, February 2, 2008

Quick and Easy Taco Salad

For my birthday my mother gifted me a new camera. Sometime in the last year I had become a food blogger and though the camera I had was wonderful for taking macros within my own apartment, it was a tad bulky to be carting to restaurants. I am not one to tote a tote big enough to fit all the furniture in my livingroom like I see some women do. I just dont have the back strength for it. Needless to say the Nikon Coolpix 5700 was not fitting into my clutch.

All of this is to say that I now also have a Sony Cyber-Shot DSC-S40. I downloaded photos I took on the new camera onto my computer for the first time today (even though I received it in November). I am extremely pleased with the results. I havent fiddled with the camera's settings and it appears I need to set the light mode to indoor lighting since few restaurants (come to think of it, no restaurants) in Lafayette have outdoor seating allowing for natural light. Here are two photos taken of the same meal: one taken with my Nikon and the other taken with my Sony. Keep in mind my Nikon has 11X zoom while the Sony only has 3X. Let me know what you think of the difference.

Specimen 1: Nikon


Specimen 2: Sony


Quick and Easy Taco Salad

1/2 lb ground turkey
1 4oz can crushed tomatoes
1/2 packet of taco seasoning (cheating, I know)
1/4 c. chicken broth
1 c. roasted corn (frozen)
1 can diced green chilies
1/2 lime
1/2 c. cilantro, chopped
1/2 red onion chopped
1 can black beans, drained
1 handful cherry tomatoes
grated cheese
sour cream (lite, if you must)
1 c. chopped butter-leaf lettuce

Brown the ground turkey. When it is cooked halfway through add the seasoning, crushed tomatoes, chicken broth, and black beans.

In a separate pan, heat the corn with the green chilies and add half the cilantro. Squeeze the lime half over the corn and stir to combine.

Put the lettuce into a bowl. Top with the ground turkey mixture, green chili corn salsa, cheese, red onion, cilantro, and cherry tomatoes.

I figure that if you dont have this over rice or wrap it up in a tortilla, you can justify real sour cream. I dont tend to scrimp on my dairy products!

Sunday, January 27, 2008

Meals in a Mug

Nothing says winter like dinner consumed from a mug. If I was still living at my Dad's that meal would be tomato soup in a mug topped with a melty grilled cheese sandwich on wheat. No, its not super healthy but it warms ya right up.

This season (so far) I have made two mug meals. The first was a "fajita" bean soup that my Mom had given me for Christmas. Sorry, I cant tell you the brand name as I have since tossed the package, but the spicy seasonings made me feel pretty toasty (it has been -18 here in the past week) and the beans helped to make the meal stick.

In an attempt to make all my hard work of exercising (5 days a week) visible to others, I made a healthier soup from scratch. I dont count it as diet food if it tastes as good as something I would happen to make when not trying for physical modification. I had been reading a lot about kale lately and had never tried it before so I figured I would throw some in the soup. The kale ended up having a nice consistency and brought great flavor to the soup. I thought it might be bitter but instead it had a sweet and somewhat creamy taste. I will definitely purchase kale again. I had a couple heads of broccoli that were nearing the point of no return and I chopped off the florets and tossed those into the pot also. Nearly all the recipes for soup bases that I had researched called for celery and carrots to begin with. Now, I dont care for cooked carrots, but I was a good girl and bought a bag of those precleaned ones and managed to cut them up even smaller. Now on to the recipe I created.

Kale and Italian Sausage Soup

1 bunch kale
2 heads of broccoli
3 cloves of garlic
1 white onion
8 inner celery stocks
3/4 c. carrots
2 sweet italian sausages
1 c. small pastas
32 oz veggie broth
4 c. water
8 cubes of frozen basil
salt & pepper


Heat olive oil in large stock pot. Saute minced garlic and chopped onion. Add the sausages after removing the casing.

Dice the celery and carrots and add to the pot.

Add broth and water as soon as meat has sufficiently browned. Bring to a boil.

Wash and dry kale. Cut it into narrow strips and discard large stems.

Cut the florets off of the broccoli.

Add the kale and the broccoli to the pot.

When the vegetables are aldente add the pasta and frozen basil and reduce the heat to a steady simmer.

Serve when pasta is fully cooked.

You should salt and pepper the dish as you go. There isnt a tremendous amount of fat (just that from 2 sausages and a tablespoon or so of olive oil) to flavor the dish. By adding salt you enhance the flavor of the kale. I am sure this is a no brainer for most of you, but I typically do not add salt to any of my home cooked dishes so when I find a dish that needs the salt, I always find it a bit surprising.

Thursday, October 25, 2007

Butter Sauce is Too Oily for Me

Inspired by several postings on tastespotting, I used the frozen sweet potato gnocchi that I had made several weeks ago and whipped up some browned butter sauce. While the sauce was very gourmet and full of frou ingredients. I think I did everything correctly in making the sauce, but it ended up being too oily for me and I would have rather just put all the same ingredients in a quick cream sauce. I guess its just a matter of personal taste. You can let me know if there is something I should have done...

Browned Butter Sauce

10 fresh, small sage leaves

1/4 cup crushed walnuts

1/2 lemon of zest

2 T. cream

4 T. butter

2 hand fulls of fresh spinach


Add the butter to a warm pan and let brown without stirring. Once browned reduce the heat (so the cream doesnt curdle) and add the sage, walnuts, and zest. Once t
he heat had reduced a bit add the cream. Quickly add the spinach and stir into the sauce. Top with pasta of your choice and some fresh parm.


It tasted pretty good but left an oily feeling in my mouth that really just made me feel like I needed a shower. Maybe reduce the butter? There wasnt a whole lot of sauce remaining the dish when I was through. ::shrug::

Monday, October 1, 2007

Homemade Gnocchi and Sauce in 30 Minutes or Less


Really, its true. It can be done. You can make gnocchi from scratch along with pasta sauce in under 30 minutes. I did it, but I doubt Rachel Ray could.

Where everyone I seems to go wrong is that they dont microwave the potatoes. This is a ste
p that takes about 7 minutes or so a potato and cuts down on prep time and dirty dishes. Boiling or steaming the potato doesnt impart any special flavor, so you should just skip that step and nuke them instead. Brilliant, I know!

Sweet Potato Gnocchi with Roasted Garlic Cream Sauce

2 sweet potatoes
1 egg yolk

salt
pepper

1/3 t. nutmeg

flour

3/4 c. cream
1/4 white wine

3 roasted garlic cloves

handful of roasted tomatoes
spinach
salt

pepper


Nuke the potatoes. The ones the grocery store sells individually wrapped are perfect for this meal. Generally the potatoes take about 7 minutes but if you are microwaving a few at once you may need to increase the time.

Scoop the innards of the potato out and mash it with the back of a fork. You do NOT need a potato ricer to make gnocchi. Add the egg yolk, salt, pepper, and nutmeg. Mush to combine.


Start by adding a cup of flour. Once that is combined slowly add more until the dough forms a ball and pulls away from the sides of the bowl. Some people use electric mixers with success but I dont have one so I do this all by hand. I think I ended up adding a total of 1 and 3/4 cup of flour to my potatoes. The amount of flour varies based upon how moistness of your potatoes.

Start heating your water to bo
il.

On a floured cutting board, separate the dough into several workable balls. With your hands, roll each of the balls out into a dough dowel. Cut the tubular dough into little pillows less than 1 inch in size. Initially the 1 inch size will seem exceedingly tiny, but once you try and bite the little suckers you will find they are the perfect size.

Heat a skillet to make your sauce in.


Once you get through cutting up the first tube of dough throw the gnocchi in the pot of boiling water. Wait about 3-5 minutes until they float to the top of the water. Once they float you will need to remove them with a slotted spoon. Repeat the rolling, cutting, and boiling stage until all your gnocchi are cooked.

During the boiling of the gnocchi, add butter to the sa
uce skillet and brown it. Once browned, add the wine and a few minutes later, once its reduced, add the cream. Stir in the roasted garlic. *Dont forget to scoop out the gnocchi.*

Line your plate or bowl with fresh spinach (it will wilt with the heat of the gnocchi and sauce).


Place a fair number of gnocchi on the spinach. Remember, they are more filling than they first appear.

Douse the gnocchi with a liberal amount of sauce and top the entire dish with roasted tomatoes.


The particular bit I like about this dish is that all the fall colors make the food seem special. Even though I made this meal for myself in yet another attempt to destress, it turned out to be presentation quality. It looks and tastes like a million bucks but only took a few minutes to throw together...appearances and reality at work yet again!

BTW, after I took the pretty little photo for y'all, I combined all the ingredients and took a picture of it the way I would typically eat it. Apparently I am not fancy enough for my own food!

Tuesday, September 18, 2007

My Tamarind Marinated Pork Chop


A while ago I asked you all what to do with a jar of tamarind chutney that I happened to find in my cabinet. I am still not certain where it came from but I am happy that it was there. Due in large part to my laziness, I decided to use the tamarind chutney to marinade a couple of pork chops. for accompaniment I purchased some flat bread and made cilantro jalapeno hummus based on a recipe from 28 Cooks.

There is no recipe here to share. I simply added about 4 tablespoons of the tamarind chutney to a baggy and zipped it up overnight with the pork chops. The next day I sauted them for 4 minutes a side (perfectly, I must say). The tamarind must have had some sugar in it because the sauce turned dark on the meat and I thought I had burnt it, but it didnt taste burned at all and the meat really was a perfect texture.

For the first dinner I ate the pork chop proper with the hummus and pita on the side. The next day for lunch I heated up the pork, sliced it, coated a pita with hummus, and added the meat. I think I like the wrap version better. Not sure why.

Sunday, September 16, 2007

A Two Course Meal - Bison Bones and Inka Imperialism

Although I was ultra-busy this week, I still managed to eat well (so I am not certain why it is that I am getting sick). The highlight of the week was most likely the Thai Basil Chicken with Coconut Rice and the Dofu topped with Tropical Fruit.

I am still obsessed with the coconut rice and will probably continue to be until I am big as a house. :) I also love the fact that I can make something that is so full of flavor and that literally takes 15 minutes total.

Thai Basil Chicken with Coconut Rice
(Yes, strangely this seems very similar to the Thai Mint Pork...its all in the technique.)


1/2 lb ground chicken
2 T. fish sauce
2 T. rice vinegar
2 T. brown sugar
3 green onions - sliced
2 gloves of garlic
1/3 c. of basil leaves
bamboo shoots
chili pepper oil to taste

1 c. rice
1 c. coconut milk
1/2 c. water


Add the rice, coconut milk, and water to the rice cooker and turn it to cook.


Quickly saute the green onions and garlic in about 1 T of oil.
Add the brown sugar, fish sauce, and rice vinegar, and chili. Stir to combine.
Add the chicken. When mostly cooked through add the bamboo shoots.
Turn off the heat and stir in the basil.
Serve the chicken and sauce over the coconut rice.


The Dofu is really just from a package that I found at the local asian store. Dpfu is the almond flavored gelatin desert you get at some Chinese restaurants. Typically it is topped with cheap fruit cocktail. I decided to up the anti and put the tropical fruit cocktail on instead. It wasnt as sweet because the fruit wasnt sitting in heavy syrup, but passion fruit juice. It also turned out a lot prettier than some tired grapes and peach bits.

I wont insult you with including instructions here since you should follow whatever your box says, just remember to try topping it with something refreshing and beautiful. I am sure you could make your own fruit topping that would work even better.

Monday, September 3, 2007

The Great Mint Event - Part 1

No matter how much I love technology, I have to admit that every now and then it lets me down. The other day I was met with the challenge of finding mint in Lafayette. Being that I am a grad student, almost by definition I live in a cheap apartment. Sadly, my cheap apartment, though I actually do like it, doesnt have a place to grow herbs. Thwarted by the farmers market, I had to make my way to the nearest Supertarget which is generally the best friend I have in this town. The particular piece of technology that I am currently unsatisfied with is the "living herbs." Come on, you've seen them!

You would think that a system that keeps herbs fresh would be welcomed. On the contrary, the mint I purchased wasnt even far enough along in its development to have flavor, let alone chop. The leaves were all less than the size of a dime so I figured since they were in the "living" container I would keep them on my counter where at least it gets a little bit of light and wait a few days for the leaves to grow up a bit. It was a great idea until I noticed that after only a day on my counter the entire plant had gone from "living" to 100% dead. After cursing my way to Marsh, another local grocery store, I ended up finding satisfactory mint and celebrated with several recipes.

Thai Mint Pork with Coconut Rice

1 lb of ground pork
2 T. of brown sugar
2 T. of fish sauce
1/4 cup mint
1 can bamboo shoots
4 scallions

1 cup of white rice
1 cup of lite coconut milk

In a rice cooker combine the coconut milk with the rice and add the appropriate amount of water (likely 1/2 cup)

Coat the pan with oil and saute the onions until translucent. Add the sugar and fish sauce. Stir to combine and add the pork. Once the pork is almost cooked through, add the bamboo. When meat is completely cooked turn off the heat and toss in the mint. Serve on top of the rice.

By making the rice with the coconut milk creates a exotic flavor in a food that is normally without surprises. It also makes the rice significantly more filling. I normally eat about two servings and this time I could barely finish one and a half due to the richness. Combining the flavors of coconut and mint make for a wonderful fresh and creamy experience.

Monday, August 27, 2007

Stuffed Bell Peppers

I had multiple things dying in my refrigerator due in large part to myriad good intentions. Specifically I had a yellow and a green bell pepper that were threatening to get wrinkly skin if not consumed immediately. I also had some wonderful yellow and red grape tomatoes that were already wrinking. While I generally eat them like candy, I dont like them when they arent pretty any longer. Hey, I am from LA it should be expected that I am superficial regarding how things are visually represented! I am not one to waste tasty tomatoes though so I needed to use those too. My garlic was also starting to sprout, and I had some ground turkey in the freezer. So, apparently, bell peppers plus tomatoes plus garlic plus ground turkey makes me want to make stuffed peppers. Warning...I have never made stuffed peppers before, but I have to say that they turned out pretty damned good.


Stuffed Bell Peppers

2 bell peppers (ones that arent green tend to be sweeter in my experience)
1/2 pound ground turkey
1 pint of grape tomatoes
3 cloves garlic, diced
4 scallions, sliced until the green portion
1/4 cup flat leave parsley, chopped
1/4 cup basil, chopped
3/4 can canelli beans
1/2 cup chicken broth
1 egg white
grated parmesan
salt & pepper

Because my tomatoes were kinda sad looking I made a pseudo pasta sauce with them by cooking them down with chicken broth and seasoning them with the garlic and scallions. It was a pain in the ass to remove the skins but I prevailed! Plus, in the end I think the tomato concoction made the meat extremely moist.

Next I combined the tomato sauce mixture with the turkey, egg white, herbs, and canelli beans. I halved each of the bell peppers and filled each of them with 1/4 of the turkey mixture. I placed the peppers in a baking dish that I had coated with olive oil, after all, whats the point of cooking food if you cant get the damned things out of the container to eat. After topping them with the grated parm I stuck them in the oven at 375 for about 35 minutes or until the internal temp of the meat was 165.

I have developed a recent fondness for things that bake in the oven because you can generally tell when they are done when it starts to smell really good. The aroma is an efficient way of getting me out of my article-induced daze and allows me to not purchase a timer.

I let them cool for about 10 minutes and ate in my usual spot, directly over my laptop. I am sure that my eating location is less than ideal for both my life and the life of my laptop but the computer is 1) my way of contacting the outside world and 2) my resource for finding the articles that will bring me closer to writing my masters.